This is a short post on Pre/Post-Freeze scripts with Veeam, I’m writing this as I’ve had no shortage of pain trying to find examples like this on the internet.
The script I have uses Robocopy to move changed files from a network share to a local disk before backup. Note that this is a .ps1 file as I have found these to work a lot better than .bat. Also, this is not a replacement for proper NAS backup, this is only if you are in a pinch and need a workaround.
I have been often asked how to set up a bucket with immuntibilty enabled to allow for connection to Veeam. This is incredibly easy but appears on the surface as complicated.
The steps are as follows:
Create your bucket.
Enable Object Lock
Create a new user with S3 permissions
Grab access credentials
See how easy is that! Oh, you want a step by step guide? Ok…
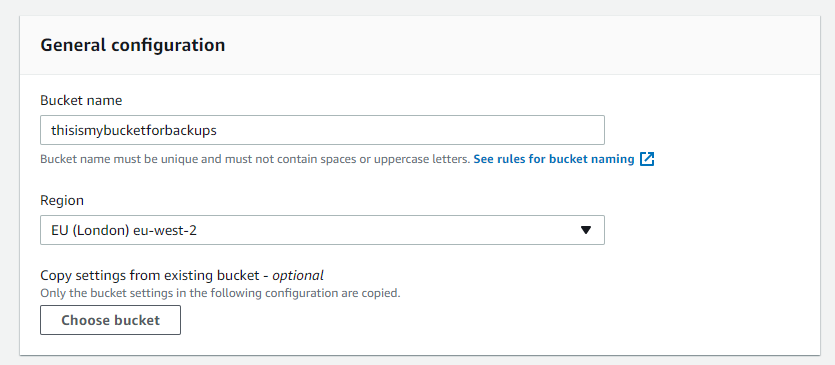
First go to S3 in the AWS console and press ‘Create Bucket’
Give the bucket a name and set the region.
Ensure that public access is blocked
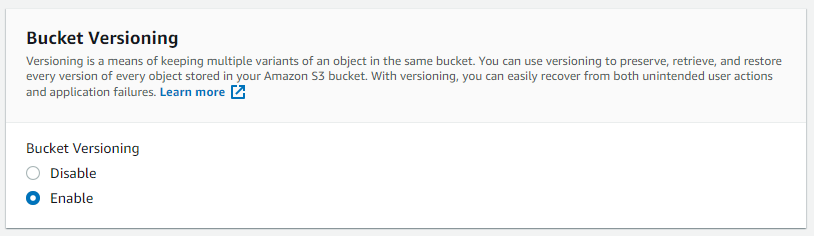
Enable verioning (this is required to enable Object Lock)
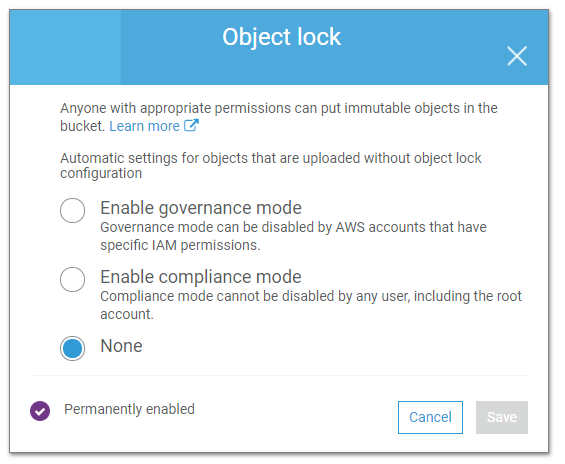
Next click ‘Advanced Settings’ and Enable Object lock
You will need to read the warning and type ‘enable’, then hit ‘create’ and you are done!
Note that if you go into the newly created bucket and then to ‘properties’ > ‘ Advanced settings’ > ‘Obect lock’ you will see this.
Do not enabled compliance mode as it is not required within the AWS interface. Veeam applies the approrpate flags in the upload via the API.
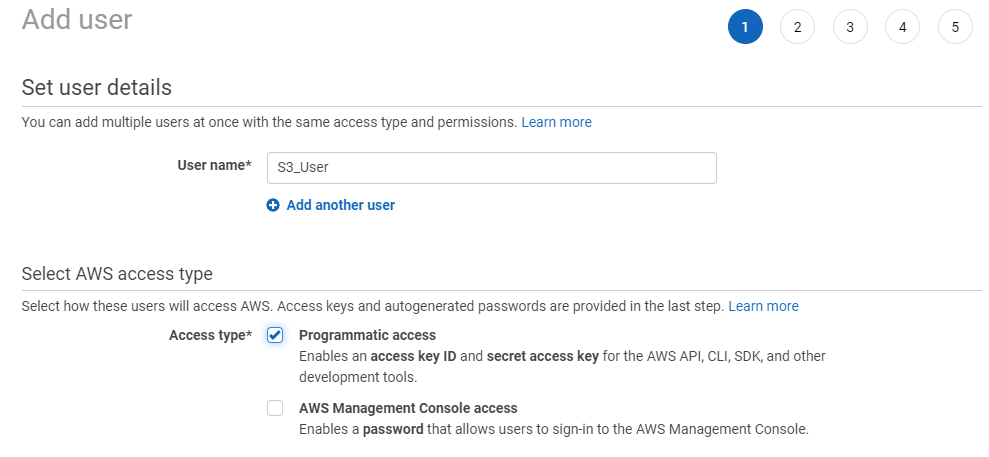
Next you need to create a user with access limited to S3 only. First got to IAM > Users > Create a new user.
Give it a name and Programmatic access.
Then go Next, press Add a Group, give it a name and then search for ‘AmazonS3FullAccess’ then press ‘Create Group’.
Add Tags if required > Summary > Create User.
This will then show you the Access key ID and Secret access key required to add the object storage to Veeam.
I’ve been trying to figure out a way of gathering host data from Linux systems for a while. I’ve explored different avenues and the obvious protocol is ssh, however, automating ssh isn’t straight forward.
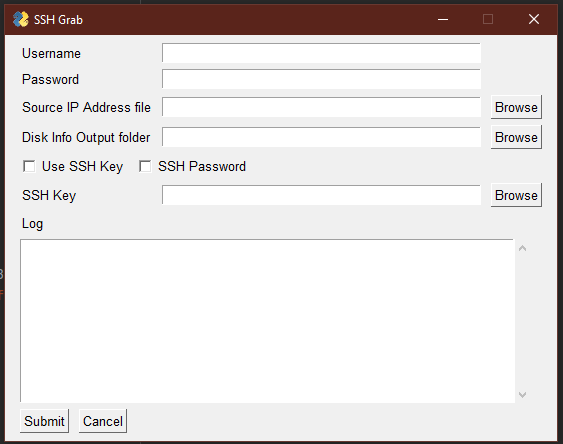
As I like Python I looked into how this could be achived using it and found the Paramiko library. This has now lead on to me writting a mini app that allows for disk info to be pulled from Linux systems with a PySimpleGUI front-end.
All you need to do is provide a text file with the IP addresses of each of the servers, one-per-line and provide a username and password. However, what I found out when using it is that Paramiko will try to any ssh keys it finds in the .ssh directory of the host. The SSH key field is only when you have a key that is not in the .ssh directory.
This is a work in progress and I’ll add updates as things progress.
I have also been looking into PyWinRM to do WinRM assessments on Windows hosts. This has proven a lot more tricky in Python and PoSH is far better suited to the job. This is mainly due to the fact that PoSH commands return actual objects where PyWinRM returns a string which is a lot more tricky to work with.
In addition to this I have also been looking at using Python Requests again coupled with PySimpleGUI and the VMware vCenter API to pull down VM information. This is similar to RvTools but more cut back and specific to just the data is needed from a data protection POV. This again has been challenging as the returned data from {}/vcenter/vm/{}/guest/local-filesystem endpoint comes back as a list of dictionaries. Unpacking that lot has been a bit challenging without it looking like loop hell. I’m sure a lamda function using .map would help but still working it out. I have to say that JS arrow functions make a lot more sense to me () => 😉
This article shows you how you can migrate backups that have been copy/tiered to AWS S3 storage and that you want to move to Azure.
The process of moving backups from AWS to Azure is very well covered in this video by Thomas Mauer.
This involves using Azure Azcopy to move the data which is relatively easy to do.
The interest piece is what you need to do in order to bring those backups backup into Veeam. Note that this is based on my personal tests up to this point and these may change as I do more.
To start the process you need to add the freshly migrated object storage in VBR via the usual Backup Infrastructure > Add Repository > Object Storage > Azure. Now, you would have thought that doing this would allow you to bring import that backups.
However what I have found with this is that any backups that are present in the repository are ‘skipped’.
I testing removing the existing copy of the backups from the capacity (cloud) tier of the SOBR, this had the same result. (Note you need to disable copy tiering before doing this or VBR will attempt to reupload them). I haven’t at this point attempted to seal the capacity tier which may work and is certainly less daunting than deleting all the capacity tier backups.
I then removed the local copies of the backups as well, this had the desired effect allowing the Azure object based backups to be imported. This extent was then added to a new SORB, this moved the object backup from Object Storage (Imported) to Object Storage. I believe the reason why it will not add the backup from the object storage is because the backup is already in VBR’s configuration database.
The next challenge was reconnecting the backup job, I did this by going into the existing backups job and mapping the backup to the new SOBR.
if you try to do this on just capacity tier alone it will fail.
So before doing this you will need to download the last backup chain to your performance tier. This can be done by going to: Home > Object Storage > Right Click Job name > Properties. You can then right-click on a cloud backup and it will ask if you wish to download just the individual bacup or the whole backup chain. This will then allow you to carry on with the backup chain like normal.
This is mainly a pondering post more than anything informative, I’ve been thinking about writing some windows based applications for a while. In this I’ve been looking at several options. However, I just cannot decided which one I want to pursue. The choices are:
Python Tkinter
Python Kivy
Electron JS
C# WPF
The Python options are attractive as I know Python quite well, however, like with everything Python it lacks a certian polish I woud like. Kivy looks like a great framework but it is quite meaty to learn and looking at some of the examples they show it doesn’t fill me with joy. Also, I hit a snag with Kivy in that it only works with Python 3.7 which is a bit of a pain.
Tkinter is on the list as the fact that it is Python native means that it cuts down on the dependencies even if the native themes are more than bit dated. From learning about it I have found it very useful in understanding on how to extend Python classes.
You may be wondering about PyQt5, this is an option but I had a look at which was the most popular and Kivy won out.
This brings me on to ElectronJS, again a great framework but it is a bit of a pig to get working with a JS Framework like Angular which is my preference. It works find with native JS nicely, however, I’m not a massive fan of working in pure JS especially when it comes to displaying data on the DOM. There is also the fact that Chromium is heavy on RAM and you need essentially known 4 different languages for it work (HTML, CSS, JS and NodeJS) plus any JS Framework you want to wrap around it.
However, on the invert of this Electron has a ton of options when it comes to user interface with the likes of CSS frameworks like Bootstrap and ChartJS.
This brings me on to good old C# and WPF, I have to say since starting working with C# in Unity for game design I like it more and more. Also the form building in Visual Studio is awesome but I have to admit I’m very new to C# still and it is a bit daunting pick it up at my age. There is also the fact I just don’t know what is possible through C# and it is a very dense subject to figure it out.
One big plus on C# side is that it has the weight of MS behind it so other languages may go in and out of vogue and frameworks can come and go, C# is very likely to stay for the long term.
This isn’t to say that I’m sold on it but it is certainly a top contender.
Update 240920
I’ve been playing around a lot more with the various frameworks and have found that PySimpleGui is actually a really good choice. It takes Tkinter and adds an easy-to-use wrapper to around it. No need to create your own classes to extend Tkinter, you just rock up and start using.
I have also been playing with PyQT5 and I must say it is impressive what you can do with the QTDesigner. But again I’m only looking to do simple one page applications at the moment so PySimpleGui is probably the best way to go.
I enjoy Python programming, there are a lot of good libraries which makes it a really good language for data analysis. This is very relevant for what I do as there can be a lot of data to sift through. Python is becoming more and more my go-to way for dealing with pretty much all calculations I do.
Yes, there is a learning curve to it which can put a lot of people of going in this direction, but trust me, it is worth it when you see what Python can do.
But Ed you handsom beast why not just use Excel? Well the problem is that it is so easy to make a mistake in Excel, mainly due to the fact there is no way to walk through the calculation steps. At least through cell based calculations.
Close to 90% of spreadsheet documents contain errors
Visual Basic has a debugger which allows you to place a breakpoint in the code and watch the calculation steps. I have found that this is good, however, I am not a big fan of VB as the learning curve is similar to Python and MS has stated that it is on the way out in perference to C#.
One option for writting your Python scripts is Visual Studio Code the link show you how to run debugging. For scripts that I will add some user input or if I’m being lazy and just want a quick calculation then this is the way I usually go.
The other option is a Jupyter Notebooks these allow you to write out your calculations in a logicial way. The notebook is arranged with cells, each cell allows for either Markdown or Python code to be written. This allows for a narrative put around what you are doing e.g.
This sizing is for X and the parameters are Z, Y & X

Z = 100
Y = 200
X = 1024

W = Z * Y / X
print(W)
All libraries that are available in Python are available within the Jupyter Notebook the argueably most important one being Pandas.
Pandas creates a ‘Dataframe’ which roughly corresponds to a table. However, Pandas is incredible for how quickly and easily you can manipulate data. For example the following code imports an RvTools excel file and exports out Provisioned and Used Capacity grouped by Datacenter and then cluster.
You will need Python and Pandas installed. (pip install pandas)
from pathlib import Path
import pandas as pd
import sys

filePath = Path("path/to/the/rvtools.xlsx")
rvtoolsData = pd.read_excel(filePath, sheet_name="vInfo")
rvtoolsData = rvtoolsData[rvtoolsData['Powerstate'] == 'poweredOn']
rvtoolsData['VM Count'] = 1
rvtoolsData = rvtoolsData[['VM', 'VM Count', 'Disks', 'Provisioned TB', 'In Use TB', 'Datacenter', 'Cluster'. 'Host']]
pivot = rvtoolsData.groupby(['Datacenter', 'Cluster'']).sum()

print(pivot) #This will show the report in both VS Code and Jupyter
pivot.to_html('report.html')
pivot.to_excel('export.xlsx')
Pandas has inbuilt methods that allow for direct export of a Data Frame directly out to HTML and XLSX. So, yes you need to know the syntax of course but imagine the time it would take to have to manually create a pivot table in Excel.
Pandas can also combine Excel files in an instant, I’ve had massive Excel files which would have been horrible to work with in Excel and Pandas just breezes through them like nothing.
This is just a quick taste of what is possible with Python for pre-sales, my aim is to add more to this blog over time.
The VSE Version 3.12 was updated a couple weeks ago adding an update to the RVtools inport. The TL:DR is that the new calculation is reduces the capacity of the estimation as parition level capacity figure instead of the ‘In Use’ allocated figure.
Since the inception of the VSE I included a RVtools import feature which easily allows users to import that data speeding up the estimation process. However, that version only pulled in data from the vInfo tab specifically the ‘In Use’ capacity figure.
This was done for a couple reasons, first there was a lot to do in the app and the RvTools inport was originally experimental. Second the vInfo tab had the more reliable information, this is because the vPartition tab which has the capacity of a VM at the partition level, relies on VMware tools to be installed and working. This is often not the case which means that many VMs can be missing from this tab.
The update will not look for vPartition tab in the file, if it is there is will then use grab the VM Name, Capacity MB and Free MB. It does a quick calculation to work out the Used capacity in GB then saves that to an array. The problem with this is that the vPartition holds the VM name multiple times, this was my part of my original issue with using that tab.
To overcome this I used the JavaScript ‘Set’ object, Sets can only hold a value once so feeding in the VM names from the vPartition tab meant it would hold a deduplicated list of VM names.
this.vPartVms = [... new Set(this.vPartMap.map(item => item.VMName))];
On a side note the JavaScript higher order function such as map, filter and reduce made making the VSE far easier. I highly recommend checking them out if you use JS.
Next the code runs a loop through each of the VM names which has another loop inside which runs through each of the VMs in the vParition VMs. Where there is a match the capacity is added to a running total and at the end of the loop the name and capacity is added to a new array. The result of this is an array with each VM in the vParition tab listed once with their total partition capacity.
However, it’s not over yet, we still need to apply this to the VMs in the vInfo array. This was done as I didn’t want to break the logic already put together for the other calculations done later. Again, another loop was created on the vInfo array with again another loop inside going over each entry in the vParition array checking for matches. Where there was one the vParition array capacity would be updated.
Note that if you don’t have the vParition tab or you rename it the VSE will just use the vInfo capacity figures it always has.
The ret result of these changes is that the capacity required for the repositories reduced significantly overall.